Controlling light is fundamental to photography.
Adjust shutter speed, aperture, and ISO on the camera just right, and you should achieve a technically sound result—a well-exposed image.
Ambient light—both quantity and quality—is limited for those of us who choose to take photographs underwater. So we carry light sources to compensate for relative darkness and dominance of blue.
Standard practice is to strive for an evenly exposed image, usually with the help of two strobes, often equipped with diffusers to soften and even-out light.
But is that always what you want?
Maybe not.
Via the following set of examples, I’d like to present the case that lighting with soft, diffuse light to achieve uniform exposure is not necessarily always the best approach. That showing only the things you want the viewer to see—and nothing more—can sometimes be the optimal choice, particularly in visually chaotic conditions.
I am not dishing the dual-strobe-with-diffuser-balanced-with-ambient-light approach. That is certainly the right way to go in many situations.
Rather, I wish to make the case that the use of directional lighting is worth learning, because in some circumstances, the absence of light is as important as the presence of it.
This is something that I have believed and practiced for decades, going back to the prehistoric days of film (eegad!!!). It has become important for me again because of my efforts to document marine life in Japan. The water in many instances is murky, environment cluttered. Lots of light evenly distributed across a scene often results in bleargh (super-advanced technical term that means yuck^3).
Let me illustrate with a series of examples, starting with this image of a female Japanese pygmy squid (Idiosepius paradoxus) depositing eggs:
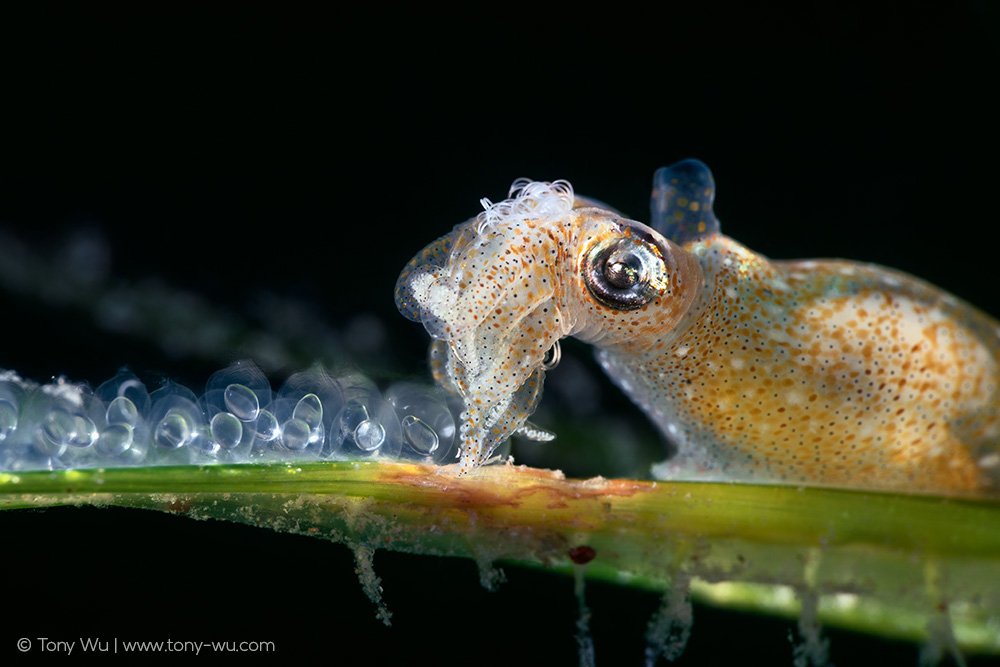
This was in shallow water, kneeling depth. The bottom was sandy, the background a field of seagrass. The squid was small, maybe 2cm (⅔ inch or so). Eggs teeny-tiny.
If I had chosen to use two strobes with diffusers, one on either side of the camera, almost everything would have been illuminated—the scrunchy-faced squid and her precious eggs of course, but also much of the surrounding grass and bazillion particles kicked up by the swells and surf. Bleargh.
Three months prior, I had purchased a Backscatter Mini Flash (MF-1 at the time). That proved to be the ideal solution.
Using the MF-1 with companion OS-1 snoot, I was able to use the flash’s narrow, hard beam at an angle of nearly 90º viz. my lens view. This meant (1) directional light to sculpt the edges of the translucent eggs, and (2) an angle of illumination that minimised backscatter.
There were a few more things involved, like using a soft fill, but the upshot is that the Mini Flash provided the type of light that I needed. It also delivered sufficient light for me to close down to f/22 at 1/250, ISO 100 in order to avoid visual distractions that would have resulted from too bright an overall exposure (It was 13:45, mid-day light). I exposed only what I want you to see.
In the next example below, I used the MF-1 and snoot with eggs of an Ernogrammus zhirmunskii prickleback. Look closely. There is a developing embryo in the highlighted egg, eye of the juvenile just beginning to take form.
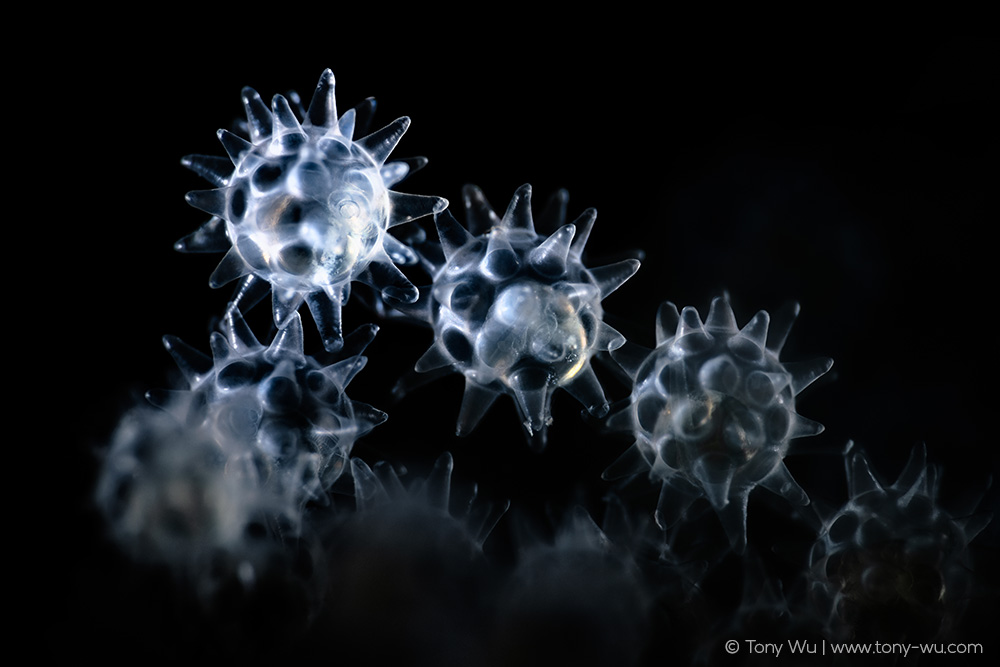
The 3mm (pretty close to zero inches) eggs are translucent and clumped together, meaning that photographing them with standard lighting would have resulted in a glob of white (where glob = an agglomeration of bleargh), against a mostly whitish sand and rock background to boot.
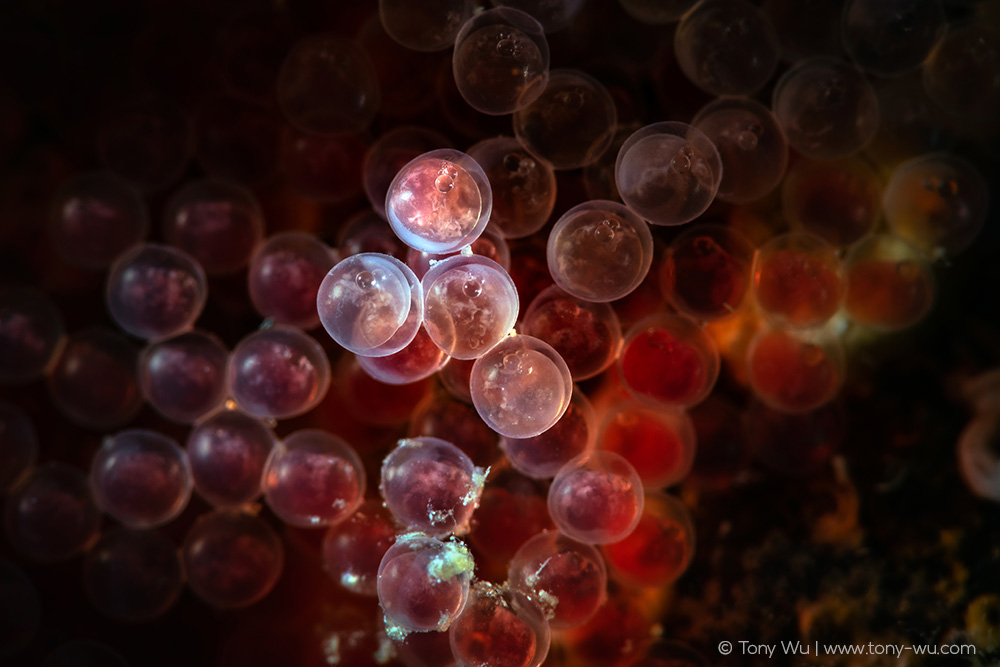
In a similar way, this photograph of fresh Icelinus pietschi sculpin eggs would have ended up as a red-orange glob, instead of as a small set of eggs visually offset from the rest, with the internal structure easy to discern:
I am not saying that this is the only way to depict tiny eggs. Here, for instance, are equally small Korean sandlance (Hypoptychus dybowskii) eggs, but lit with two Inon Z-240 strobes, because conditions were ideal for such—blue skies and clear water.
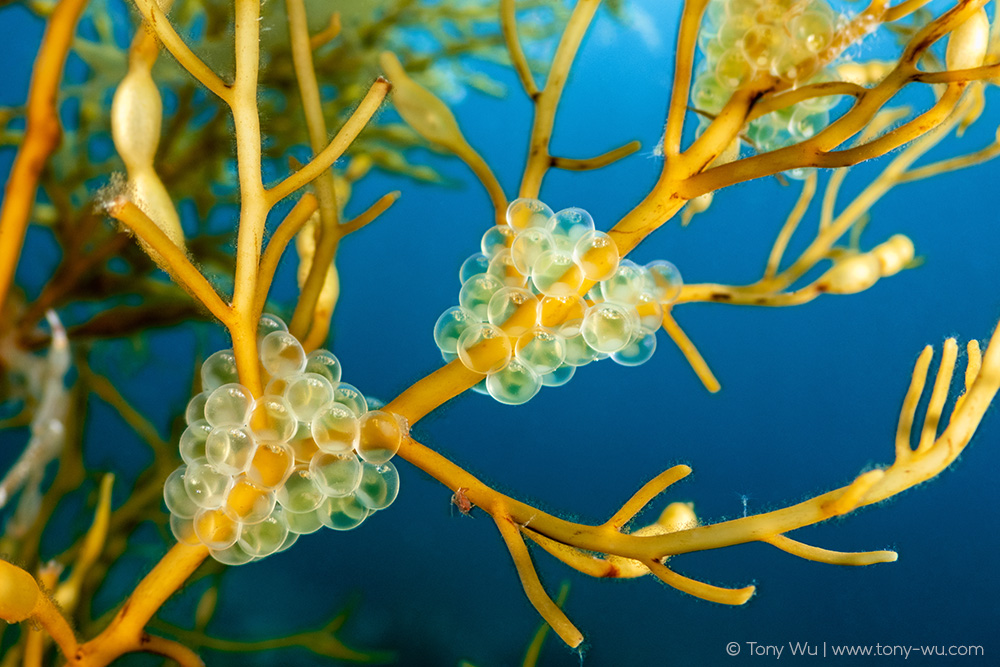
What I am trying to convey is that lighting equipment and techniques are like tools in a tool box. The more options you have and master, the better you’ll be able to adapt to situations that nature presents.
As with actual physical tools, there is no reason to limit oneself to using just one. A screwdriver wouldn’t be the best choice to hit a nail for instance, and building a shed is best achieved with an assortment of tools.
In other words, sometimes combining light sources with different characteristics works best.
Along those lines, this photo of a Tozeuma sp. shrimp illustrates what can be done with a variety of lighting tools—primary directional/ back light from an MF-2 (the current Mini Flash model) and snoot + secondary directional/ rim lighting from two Inon S-2000s and soft fill via a Z-240 (read previous blog post for details).
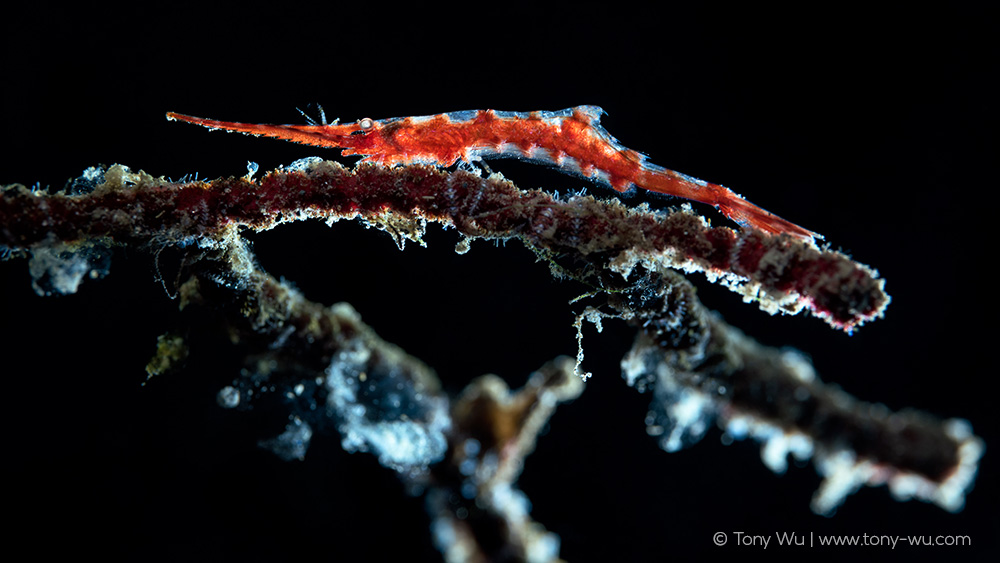
I didn’t go to all that trouble for fun. The process was decidedly not fun.
I did it because it would not have been possible to create the above image with any single type of lighting. And conditions were such that standard lighting with strobes + diffusers would have resulted in…yes, bleargh. Super bleargh, because so, so much silt and muck.
Here is another example of a difficult scene to light without losing the main subject in reef clutter, a well-camouflaged red streaked blenny (Cirripectes stigmaticus):
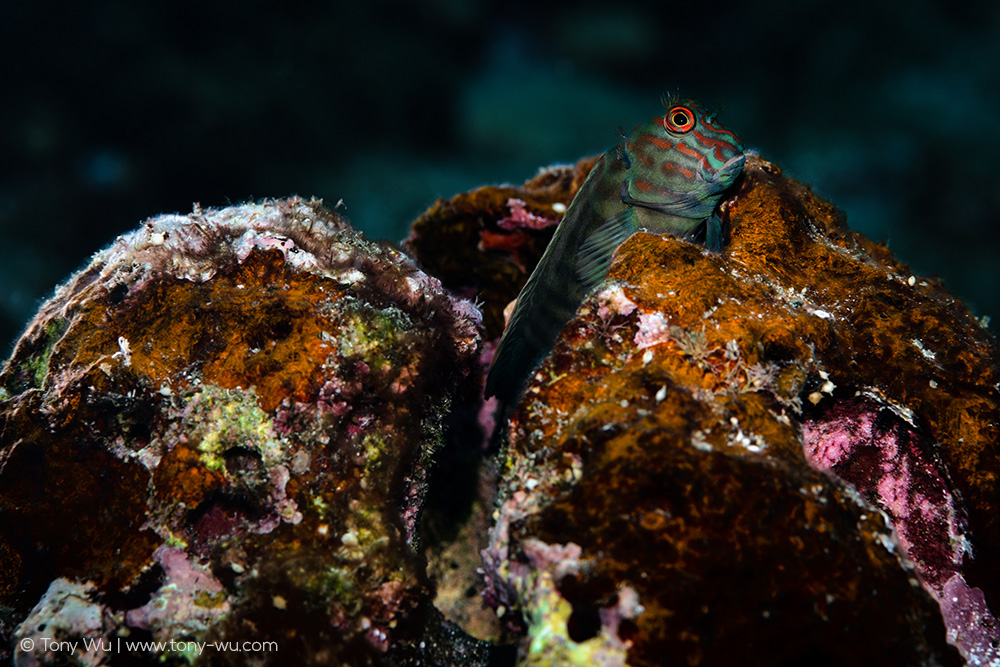
I used three flashes, two Z-240s and an MF-1. One Z-240 provided fill. Another provided hard side/ back light to rim the coral. An MF-1 with snoot put a spotlight on the fish’s face. It is a skittish species, so I only had a couple of tries. In a perfect world where I had all the time I needed, I probably would have turned down the fill Z-240 a notch or two, maybe the MF-1 up one.
But you see my point.
Lighting is an exercise in problem-solving. Each situation presents you with a set of challenges—junk in the water, current, camouflage, movement, obstacles, remaining air, and so forth.
Figuring out what might work best is critical. And having the most options available to you really helps.
I’ve mentioned the Backscatter Mini Flash a lot because it has expanded the set of lighting options available to me more than any other flash I’ve used to date.
In part, this is due to the environment I am concentrating upon now. As you might surmise from the examples above, many subjects are small, and they tend to blend-in to their (often mucky) surroundings.
The companion snoot is useful in circumstances where I want to pluck the subject out of a noisy, unattractive background. But also, having the choice to use the snoot or not to do so gives me lots of flexibility. Snoot on; snoot off. It’s that quick, so I am not tied to a single configuration.
Size is also a consideration. The MF-2 is small enough that on most dives, I carry at least one with me, two if I know the terrain—which means I always have the option to use the strobe or not, as the situation requires.
This is in addition to having two or more other strobes. Because I like having choice.
The size and shape of the MF-2 means that I can often snuggle it into nooks and crannies where there would be no hope of using larger flashes.
The following image of an elkhorn sculpin (Alcichthys elongatus) is a perfect example. It is a male, maybe 40cm (16 inches) or so in length, atop a carpet of bright yellow eggs that he is protecting. The fish (decked out in fancy colours for reproductive season) and eggs are inside the pitch-black space created by boulders. The opening to peek in between the rocks was maybe 10cm (4 inches) in height at one spot, much narrower in most places. It was low to the ground, at an upward angle.
Meaning…nearly impossible to see, and ridiculously difficult to light, much less photograph.
This is why there are few images of this species brooding in its natural habitat.
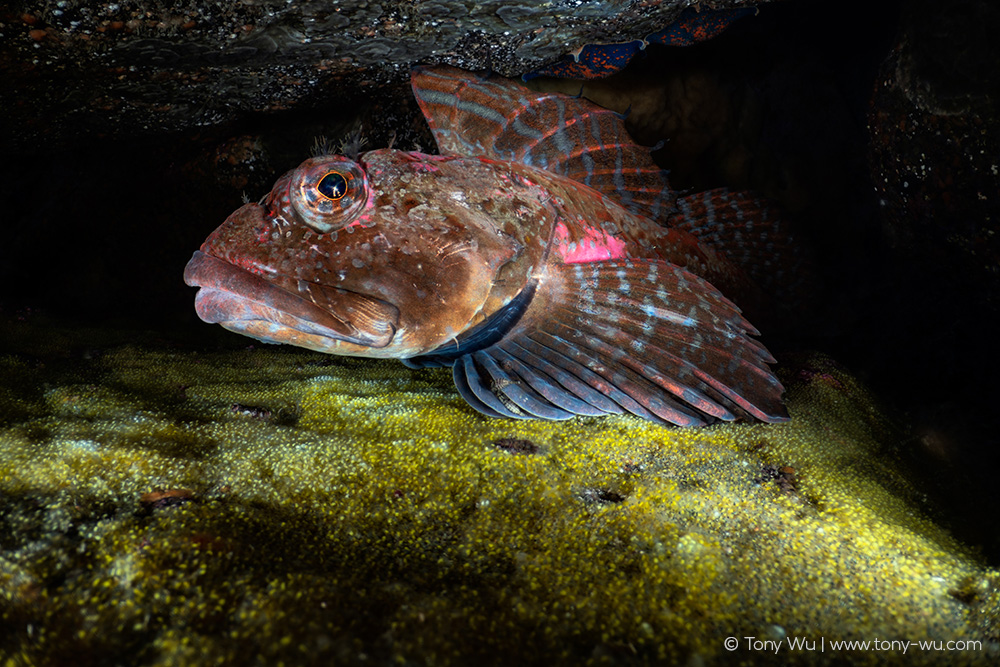
The key to documenting this behaviour was using the two MF-2 units. The flash diameter is small enough that I was able to wedge them in place. The built-in target light gave me the ability to see into the dark cavity and aim.
I did not use snoots. I removed them and set them in between some rocks for safekeeping. I also did not use diffusers, because I wanted harder, directional light to create shadows and make the eggs sparkle like gems.
Finally, the Mini Flash works well as a slave unit. Backscatter makes what they call a light pipe. It fits into the fibre-optic sync socket and picks up light so you trigger remotely.
Sometimes I use the flashes on-camera, sometimes off. It just depends on the situation.
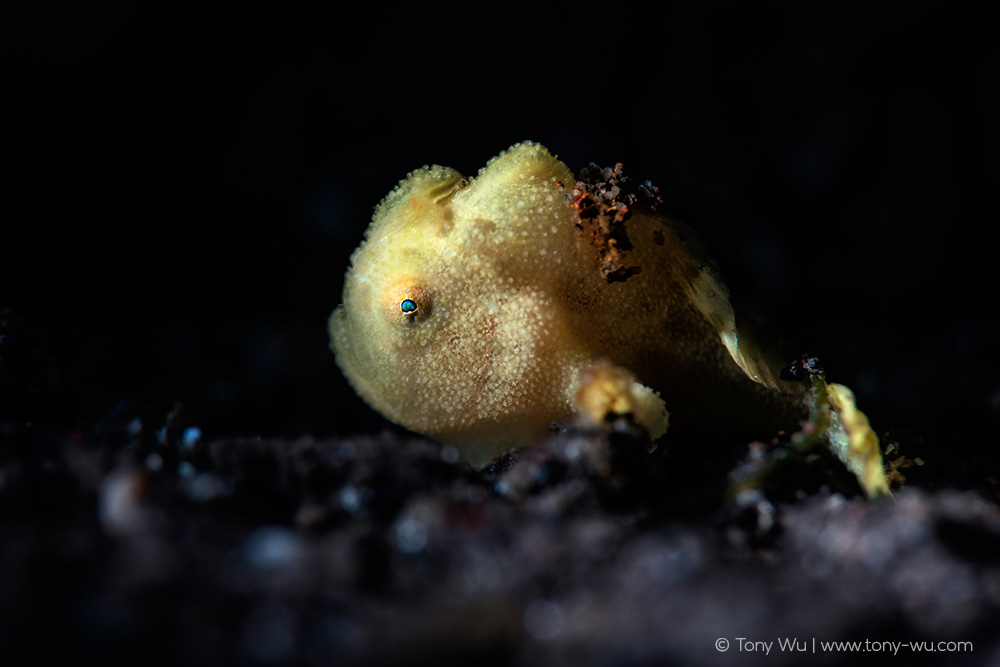
Here, for instance, having a single MF-2 with snoot to the left as a slave unit worked perfectly for this 2-3 week-old, 15mm (half inch ±) painted frogfish (Antennarius pictus):
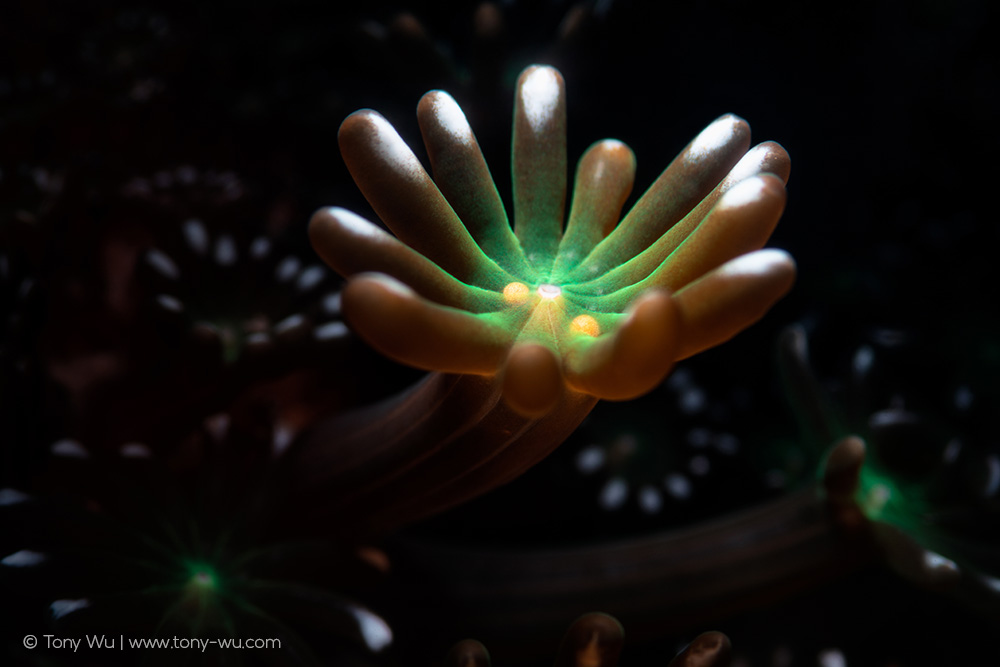
In contrast, having the flash on-camera made more sense to highlight a single polyp and developing planulae (larval corals, the orange dots) of Alveopora japonica coral:
This photo of a male Sagamia geneionema goby, a species that is common in Japan, was another difficult situation where multiple strobes came in handy:
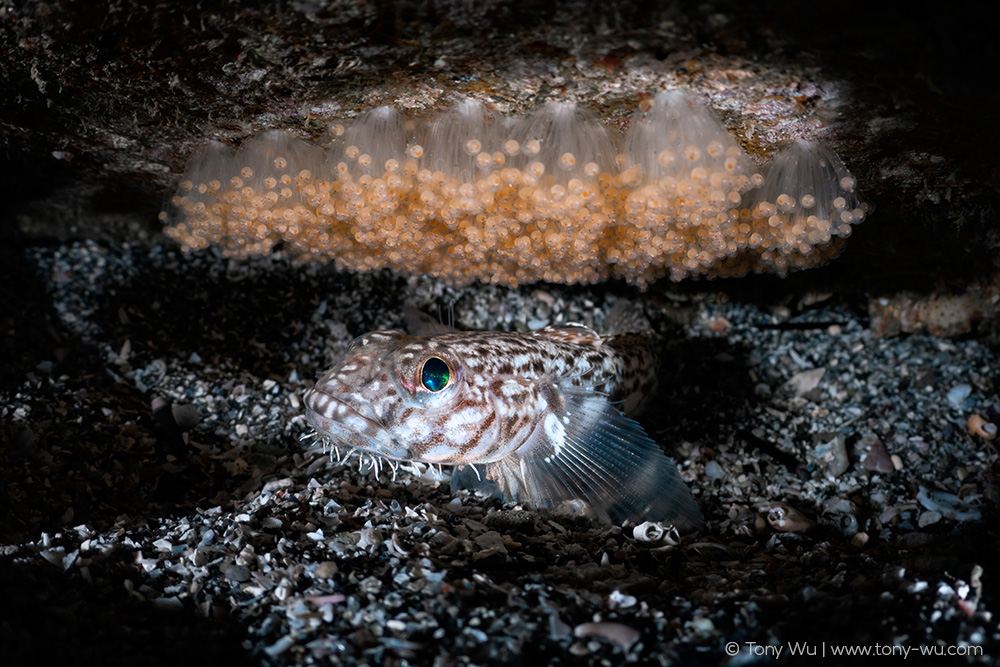
The fish was maintaining vigil for the eggs above its head, in a narrow crack of a crevice nestled between rocks, on the seabed, in a place that presented an awkward upward angle, in less than 2m (6± feet) of water. I used two S-2000s as slaves to pick up the optical signal from two on-camera Z-240s. The S-2000 units then triggered two MF-2s. The terrain was not conducive to triggering the MF-2s either directly with fibre-optic cables or as slave units to on-camera flashes. This was the only set-up that worked.
It worked well.
I was able to bring out only the important bits—the fish and the eggs, with just enough light brushing the substrate and ceiling to provide context, but not enough to distract, and just enough shadow to impart a sense of contour and dimensionality.
As you can see, the Mini Flash has made it easier in many circumstances to transform the images I envision in my mind to pixels in my camera, sometimes just with MF units, sometimes in combination with other flashes.
It is not that I could not achieve similar results previously. It was just more difficult, because underwater flashes tend to be designed for the express purpose of providing even lighting over a wide angle of coverage.
The first time I photographed eggs of an Ernogrammus zhirmunskii prickleback, for instance, I had two Z-240s with me. This was the result:
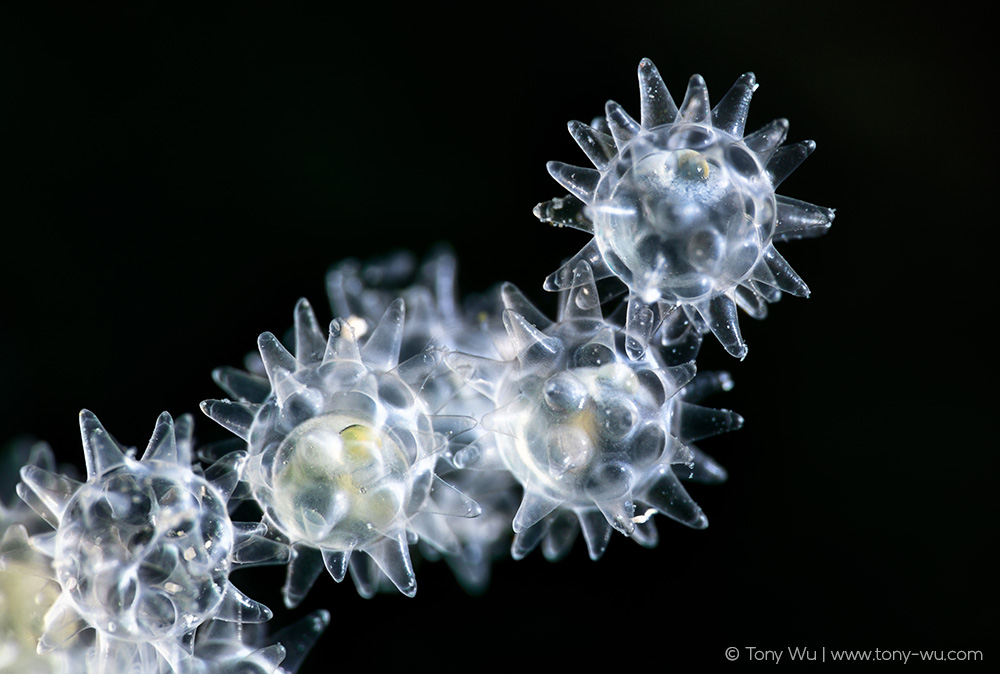
Not bad. In fact, I was ecstatic. It took a lot of work (accompanied by muttering of multi-lingual expletives) to hit those tiny eggs just right with the very feather edge of light from the flashes, at an angle that did not wash out delicate details.
It was so frustrating though that I had no interest in trying again. Until I had the Mini Flash.
Look back at the second photo above (eggs of the same species). I used the same D850 camera for both photos.
The unique structure of the eggs is more defined in the photo I took with the MF-2. The eggs look chiseled in the MF-2 photo, sort of spongey in the Z-240 image (best adjectives I could think of).
That is due to the difference in the quality of light produced by the strobes.
In typical discussion of underwater strobes, emphasis falls to things like guide numbers, angle of coverage, light fall off, temperature.
Quality is usually not discussed in detail, in part I think because it is difficult to quantify. Guide numbers are expressed as numbers. So even if you do not entirely understand what a guide number is, it is easy to comprehend that 32 is bigger than 22, so all things being equal, the strobe with 32 guide number pumps out more light.
I can’t give you a number for quality. I can’t even really give you an adjective. I can just show examples and explain that by saying “quality” in this context, I do not mean good vs. bad, but rather, something more akin to type.
“What type of light do I want?” is perhaps a way to phrase the thought that I have each time I consider a potential image. The answer depends upon the subject, the mood, the environment.
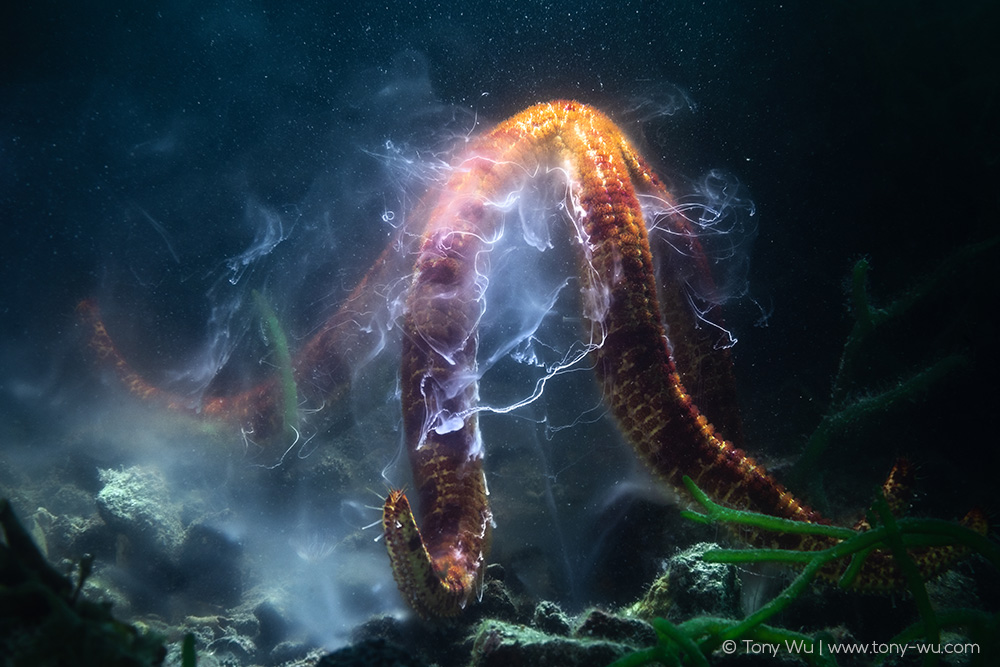
There have of course been times when my Z-240s were the right tool to sculpt light just-so. One of the best examples I can show you is this spawning Leiaster leachi starfish:
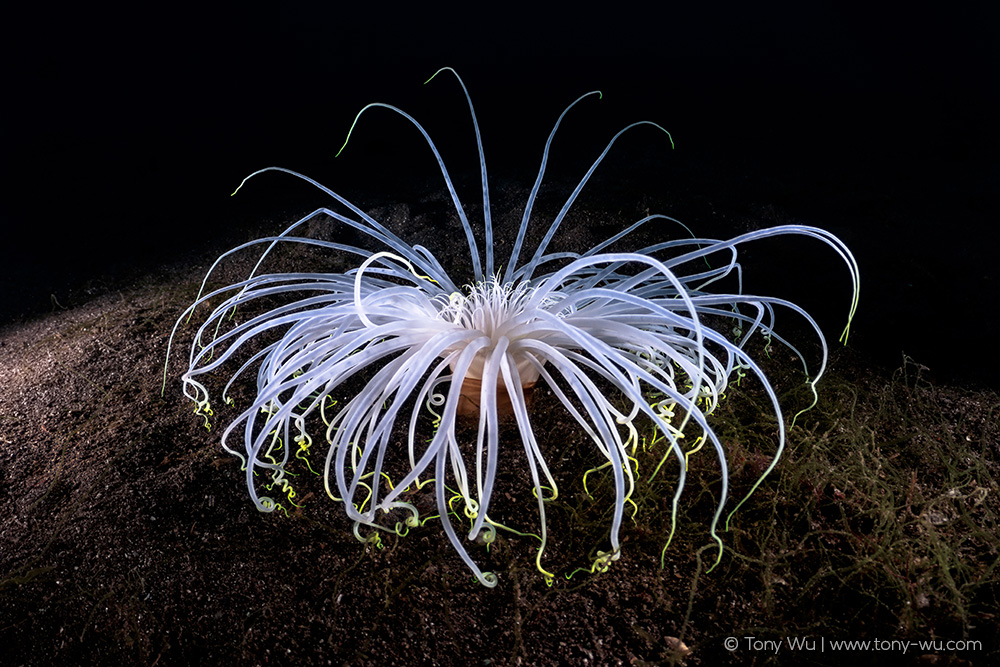
And again, sometimes it makes sense to mix-and-match, like this image of a Cerianthus filiformis tube anemone, which involved a Z-240 as soft main light, and a Z-240 and MF-2 as secondary hard lights:
There is certainly much more to this topic than what I've discussed here, but in summary, it boils down to this as a general guide: Use soft light and show everything when appropriate (like say a beautiful coral reef in crystal-clear blue seas); choose hard light when circumstances warrant (subjects in murky temperate and colder seas, for example). Mix-and-match to highlight aspects of your subject that are important while de-emphasising those that are not.
There are of course exceptions and different ways to depict the same situation. Rather than a hard-and-fast rule, think of this as a base from which to start.
Finally, for the sake of clarity, this is not a paid/ compensated post. No one asked me to write this. Backscatter may or may not like/ agree with my views about the Mini Flash. I bought my first MF-1 in January 2021. The MF-2 units I use now are on loan from Backscatter. I’ve had my Z-240 and S-2000 flashes since 2008.
If you are an underwater photographer and find yourself in situations similar to those I now face, perhaps my ramblings about quality of light might be useful.
The good thing is that there are more commercially available lighting options for underwater photographers now than ever before. So by all means, try/ use what is available to you to experiment with quality of light.
