Having spent the past few days completely buried in editing, I'm still a bit wired, with my brain stuck in editing mode.
I decided to direct my OCD energy into something productive, so I put together the diagram below, which sets out the workflow I followed for my Ambon Beneath The Waves video.
Video of marine life in Ambon
If you're a photographer thinking about delving into multimedia projects, or you happen to be interested in reading about what's involved in putting together something like the Ambon video, read on.
If not, my rambling will undoubtedly bore you, so it's probably best to skip this post.
If you happen to be a video expert, you might find this amusing, and I'd certainly appreciate tips on what I can do better.
To preface the balance of this discussion, let me underscore that this workflow isn't set in stone. It's part of an evolving methodology that I've been refining and re-jigging over the past few years, so what I describe below is best characterised as a snapshot in time, rather than a hard-and-fast recipe.
It's the current status of what I've learned through trial-and-(lots of)error, and I have no doubt that the methodology I follow will change again with the next project I undertake.
Also, please note that I use Macs. I always have, and probably always will. The software I discuss below is mainly for Macs. The basic thought process I outline below should, however, apply irrespective of the hardware platform you prefer, and there are equivalent programs available for non-Mac computers.
For ease of explanation, I've divided my workflow into four major sections: Acquire Media, Organise Media, Edit Media, Output Media (logical, no?).
Acquire Media
Arguably, this is the most important step. Without high-quality raw material, there's not much point going further.
For the Ambon project, I used a combination of photographs (taken with Canon 40D, 7D, 5D and 5D Mark II cameras), underwater video clips (taken entirely with a Canon 7D), and an audio recording (captured with a Zoom H4n).
Of course, there was much more hardware than cameras involved, like three SOLA 600 lights (courtesy of Light & Motion and Scubacam) and a FIX LED1000DX light to illuminate the video clips, lots of strobe, tonnes of batteries, a few Gorillapods, and a bunch of homemade bits and pieces held together by miscellaneous nuts, bolts, tape and crossed fingers.
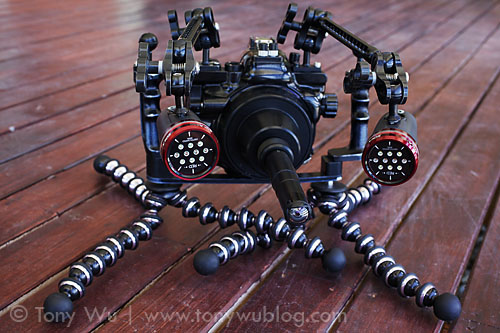
Acquiring media = Carrying lots of stuff
As you can see from the chart at the end of this post, I use high-quality formats for capturing data (RAW for photos, 1080p for video, 24-bit/ 48kHz wav for audio). The thinking behind this is simple: It's easy to downsample; it's not a good idea to upsample.
If this is obvious to you, good. If you don't understand why this is necessary, you might want to read up on image, video and audio formats.
I use a software program called Photo Mechanic to ingest all my image and video files, because it's lightning-fast, which makes it perfect for doing a first-cut edit to weed out obvious rejects.
With Photo Mechanic, I rename all my incoming files in sequential order, using the following naming convention:
yearmonth_location_description_number
So the first underwater photograph from my recent trip to Ambon would be:
201011_Ambon_Underwater_0001
…with all of my underwater images and video files in a single folder on my hard drive.
I don't ingest audio files with Photo Mechanic. I copy directly into a dedicated audio file folder and label the files as necessary. I have the Zoom H4n set up so it names audio files by date and sequentially, and just add descriptive terms after the file name.
For example:
101127-003.wav
...means the third file I recorded the on 27 November 2010. The H4n assigns this name automatically.
Then I augment the file name to:
101127-003_panggayo.wav
…so it's easy for me to see that this is Michael's rendition of Panggayo.
At this stage, I make two backups of everything. Basically, if I don't have three copies of every file, they don't exist. Digital files are really convenient, but they're also easy to lose. All it takes is a malevolent cup of coffee...
Also, I've come to realise that it's not necessary for me to separate RAW photo files and video files. I read them all into the same folder, and name them sequentially as outlined above.
At first blush, you might think this would be confusing. It would, were it not for Aperture, which is the key to the next major step in my workflow.
Organise Media
Aperture is a really powerful software package. As I pointed out before in a review of my initial experience with Aperture 3.0, there are some things that I find vexing about the program, but on the balance, I find it incredibly useful. (Many of the issues I had before have been addressed in subsequent software updates.)
Put simply, Aperture is the backbone of my workflow.
First, I create a new, dedicated Library for each project/ trip. This is essential, as I find Aperture's performance drops if you ask it to manage too many files.
It's good risk-management as well, since a Library crash or database corruption would affect only one specific endeavour, as opposed to all my files.
I import all my photo, video and audio files into the dedicated Library as Referenced Files in Projects (usually one Project for underwater files and another for land files), meaning the files stay where I put them on my hard drive using Photo Mechanic. I do not import the actual files into the Aperture Library. (I know the jargon is a bunch of gibberish if you're not familiar with Aperture, but I can't really go into a detailed Aperture tutorial here.)
Next…and here's the key…I use Aperture's Smart Albums to sort through my jumble of files. (Smart Albums are basically a way to sort through data automatically using parameters that you specify. Basic database stuff.)
I assign star ratings and/ or colour codes (easily accessible with keyboard shortcuts) to all my files, and then create Smart Albums to pull out relevant files into easily viewable screens.
I end up with quick-and-easy access to the files I like the most (while also keeping the other files handy in case I need them).
Since my audio files are in a separate folder structure on my hard drives, I don't need to separate them from the photo and video files. I import them as Referenced Files into a separate Project structure in the same Aperture Library, and again use a Smart Album to select the audio files I like.
I keyword and caption all the files I can, so I'm able to search for specific files later.
At this point in my workflow, all my favourite files will have been distilled into a series of Smart Albums, which means I can view/ listen to all my selected files whenever I want.
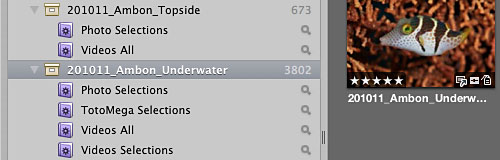
Projects and Smart Albums in Aperture
It's also very easy for me to remove files from Smart Albums (without actually deleting any files), or to assign new files to Smart Albums. This is perhaps the single most useful feature of Aperture for me...imposing order on chaos.
I can't overstate how powerful this sorting capability is. If you keep everything in traditional folders on a hard drive and look through them manually, it would take you much, much(!) longer to find and keep track of the files you want.
As a bonus, I use Aperture to do 90% of my photo editing, meaning that I don't have to resort to Photoshop too often (a good thing, given what a Photoshop dunce I am). And…here's another kicker…I use Aperture to Trim video and audio clips.
Aperture plays the H.264 video clips from my DSLRs with ease, so I can view, select and Trim my video clips to just the parts I want. Aperture can do the same with audio files.
This capability is vital as preparation for the next step.
Edit Media
With all my media organised and sorted into Smart Albums, photos 90% edited in Aperture, and video and audio clips Trimmed to relevant sections…I'm ready to proceed to the core of the editing process.
By now, I have a storyline in mind, so I have a decent idea of what media I'll need at specific stages of the editing process.
As a general rule, I start with audio…whether it's background music, interviews, sound effects or ambient sound. It might seem counter-intuitive, but I've found that audio is the most important part of a visual presentation.
If I know how the audio for a project will go, it's relatively easy to adjust the visual elements. If I try setting the visuals first and then adjusting audio…I usually end up with a big mess.
Maybe it's just me, but that's what works for me.
So…if Photo Mechanic is the core of my media acquisition, and Aperture the core of my media organisation process, Final Cut Pro is the core of my editing process. (FCP is part of Final Cut Studio.)
FCP is a challenging piece of software to get your mind around. The first time I tried FCP, it took me a couple of days of futzing around until I got the hang of the program, but I had sort of built up to FCP by learning less involved software packages like Fotomagico and Aperture (which I used to edit my Lembeh video earlier this year) first, then using Final Cut Express…so I sort of had a head start. Going into FCP cold would've been a lot tougher.
For the Ambon video, I decided to use FCP (over Fotomagico, Aperture or FCP Express) for two main reasons.
First, Michael's rendition of Panggayo has an upbeat rhythm, and I wanted to use the song's beat and pace to carry the visuals. In order to do this, I needed to be able to time the ins and outs for all the graphics. By using Markers in FCP, it's relatively easy to predetermine and visualise transition points.
Most likely, there are ways to achieve the same thing in the other software options I have access to, but I'm very comfortable with the Markers in FCP.
Second, I knew that I wanted to create titles with a bit of animation, and also that I would need to edit the audio recording to remove background noise, cut out ambient disturbances and use an equaliser to bring out the depth of Michael's voice.
FCP, Motion and Soundtrack Pro work well together, meaning I can send/ receive files from one program to another, and whatever edits I make in one program are reflected in the others. Very slick once you figure it out.
Anyway…one of the keys to using FCP is knowing from the beginning the format of your source files. So, for instance, I set my FCP timeline for the Ambon project to take 1080p video at 30fps (29.97) in ProRes (LT) format with 48kHz audio.
Before starting my FCP edit, I needed to ensure that my selected media suited the timeline specs.
Photos were easy. I exported edited Versions from Aperture as 72dpi jpgs at original size. For some images, I needed to bit of clean-up, so I used Photoshop for finishing touches (like backscatter removal).
Audio was simple in this instance as well. I used the original recording, which was at 48kHz.
Prepping video footage required more work. Canon DSLRs capture video footage in H.264 format as Quicktime files. The compression is quite high, so it's not a great format for using in editing software like FCP.
To get around this, I had to transcode (change format) from the H.264 files to ProRes (LT), which is edit-friendly and of sufficient quality for what I want to achieve.
There are a number of ways to do this. Canon released a plugin for FCP for this purpose. It works, but I've found that I don't need or particularly like using it.
Remember I said that I use Aperture to Trim video clips to the specific sections I want? So, for instance, let's say I have a 90-second clip, but only really want to consider a 10-second portion for the project.
In such a scenario, I would use Aperture to Trim to that specific 10 seconds (a very easy process in Aperture), and then export that Trimmed Version (meaning the exported file would be only the selected 10 seconds, not the full 90 seconds).
I would then use a free software program called MPEG Streamclip to transcode to ProRes (LT) format, which works really well in FCP.
For this specific project, I had one more problem to solve. For a previous project, I had set my Canon 7D to capture video at 24fps (23.98) instead of 30fps (29.97)…and I forgot to change the settings until part way through my stay in Ambon. Bummer, but not insurmountable.
Using Cinema Tools (part of Final Cut Studio) I conformed the 24fps (23.98) video footage to 30fps (29.97). The speed of the video changed a little bit, and the audio no longer synced, but it didn't matter too much, as the clips were short, and I didn't need the audio (just recordings of me breathing underwater).
So…with all my media in the proper formats, I imported all the files into FCP, arranged them into folders (called Bins in FCP) and set everything out on my timeline.

Folders, or "Bins" in Final Cut Pro
For finishing touches, I used Motion to create the titles/ text animation, and Soundtrack Pro to polish up Michael's rendition of Panggayo.
Both software packages are incredibly powerful, and I've only scratched the surface of what they can do, but I've mastered them enough to get what I need done, and will continue to learn a new trick or two with each new project.
Output Media
Finally, when everything was just right, I Exported from FCP at full resolution (File, Export, Quicktime Movie) to create a master file with no compression.
I used a nifty device called the Elgato Turbo.264 HD (which Eric Cheng introduced me to earlier this year) to convert to a preset format suitable for uploading to Vimeo, and used a software package (which is unfortunately no longer available) called Visual Hub to create a file that conforms to iTunes specs.
That's it! See how simple that was?
At some point, I'll probably delve into Compressor. I just haven't found the time or motivation to tackle yet another software package.
Summary
As I mentioned at the beginning of this post, I'm still learning, and I'm pretty certain there are better ways of doing the things I've described above.
One frustration I did experience with this workflow was maintaining the quality of still images in the final output. Some photos looked bad no matter what I did, and I had to replace them with other images. It seems like FCP exaggerates noise in photos, especially for images with low depth of field. FCP also seems to brighten all photos upon export, so what I see during editing isn't quite what I get after export.
Aperture seemed to do a relatively better job with photos in my Lembeh Night Safari video, which I edited and output entirely in Aperture. One possible explanation is the fact that I imported jpg files (albeit high quality jpgs) into FCP for this project, while Aperture exported the final slideshow/ video using RAW files as the source files.
Whatever the case, it's something I'll have to figure out in the future. Perhaps there's some way to get the best of both worlds.
There's obviously a lot more to each step along the way than I can set out here, but I hope this overview and the chart below are helpful. If you have any tricks, pointers or solutions…please share!
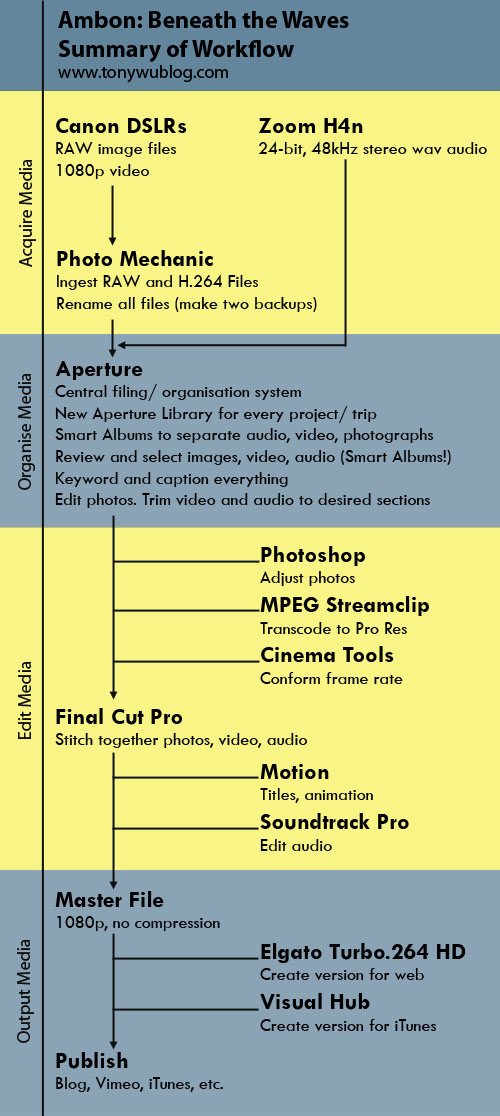
Workflow I used to edit my Ambon: Beneath The Waves video