I'm giving a talk in Osaka this Friday about whales, which means I have to edit and process a number of photos to flesh out the presentation outline I've come up with for the occasion.
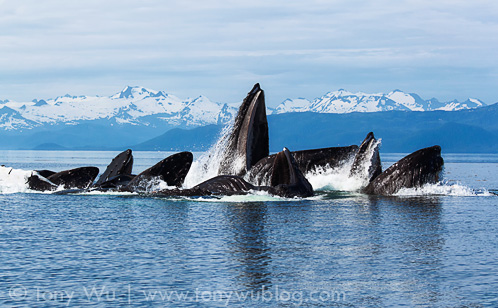
Humpback whales bubble net feeding in Alaska,
the photo I just finished editing with Nik Software
Just so you know...processing photos is one of my least favourite things in the world to do. I'm happy to devote endless hours to thinking up new ways to create beautiful images, but when it comes to sitting in front of a computer and working with Photoshop...well, that's about as appealing to me as going to have wisdom teeth removed...sans anaesthetics.
One of the primary contributors to my lack of love for editing is the complexity of Photoshop. Suffice it to say that I often can't make heads or tails of what I'm doing. I get so frustrated that I give up and go do something more enjoyable, like wash dishes or take out the garbage.
Anyway, in the process of putting together my upcoming presentation, I started playing with some plug-ins from Nik Software (Disclosure: I received the set of plug-ins from Nik).
Given my limited experience with this tool set at this stage, I'm no expert by any means, but I find myself liking the plug-ins so much that I thought it worth sharing an example of the workflow I used to process the photo above of humpback whales bubble-net feeding in Alaska.
To start...I use Aperture to keep track of my files, but I generally don't use it for RAW conversion, except to churn out quick-and-dirty files for blog posts.
Most of the time, I use the RAW converter in Photoshop, in this case Photoshop CS5 (I haven't upgraded to CS6 yet). I work with 16-bit PSD files in Adobe RGB colour space, and I do my best to ensure that my files stay within parameters suitable for CMYK print processes.
Keeping in mind that you can't make a sucky photograph into a good one, this screenshot shows the main settings I used for the conversion of my RAW file shot on a Canon 1D MkIV, basically very minor adjustments...fine-tuning the colour temperature and a slight tweak to the exposure:
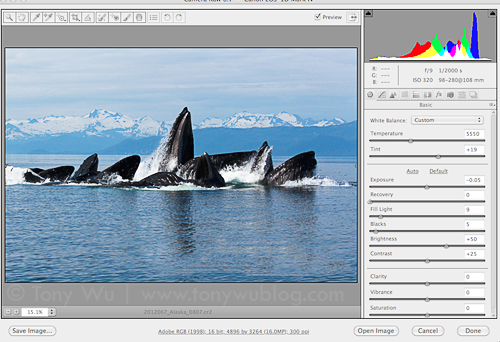
RAW conversion of my humpback whale photograph
From this point forward, I used a series of filters in the Nik Complete Collection to get to my finished image:
1. Define 2.0 for Noise Reduction
I shot this photo at a reasonable ISO rating of 320, so there wasn't too much noise. Still, I've found it useful to start my editing process by running every image through Define 2.0, which is the Nik plug-in for noise reduction.
The plug-in gives you the ability to tweak settings manually, but so far, I've found that letting the plug-in do its thing...measure noise and automatically decide how much to reduce it by...works exceptionally well. Hurray for that!
To give you an idea of what the plug-in decided for this photo, here is part of the image at 100% before I ran Define 2.0:
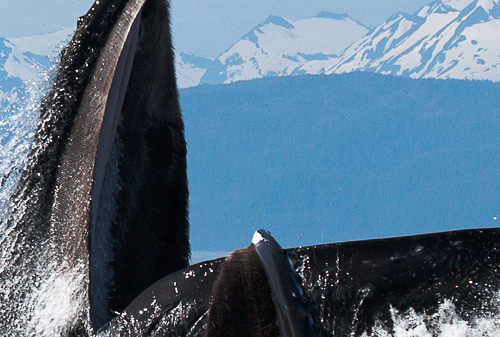
100% view before running Nik Software Define 2.0
And there is the same part of the image after running Define 2.0:
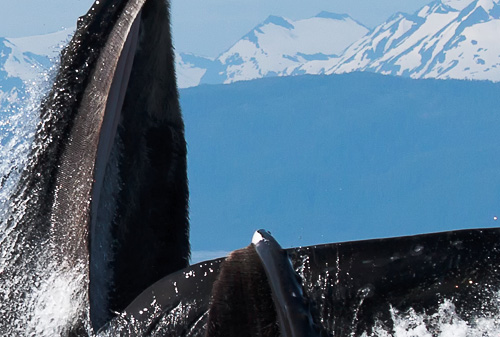
100% view after running Nik Software Define 2.0
To my eye, the plug-in did a great job cleaning up noise. The best part is...I didn't have to think about it! I let the plug-in do all the work.
As you can see, the de-noising process also masks some detail. In the Before screenshot, you can make out some detail in the trees in the background. In the After screenshot, not so much.
In some situations, loss of detail might pose an issue, but here, it was perfect, as my objective is to draw your eye to the whales, not the background.
There was a bit of detail loss in the whales as well, but I had a plan for that (step 6 + normal sharpening at the end of the editing process).
2. Color Efex Pro 4: Graduated ND Filter
After cleaning up the noise, I decided that I wanted to even out the exposure levels a bit between the sky and the ocean, so I turned to the Gradated Neutral Density filter in Color Efex Pro.
This is where I learned about Control Points, which is Nik Software's method for applying the effects you want in a selective manner.
In this instance I wanted the sky/ sea exposure levels to be more even, but I didn't want the whales to be affected. So I used the Graduated ND filter to make the sky darker, with the reduction in exposure values gradually decreasing as I moved down the image. I then used the Control Points to tell Color Efex Pro to exclude the whales from the adjustment:
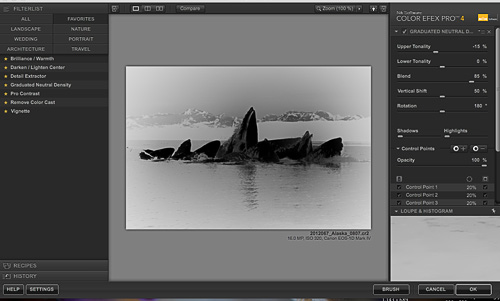
Using the mask view to see what areas the control points are affecting
The white/ light areas are where the filter is being applied. The dark areas are where the filter is not being applied.
(I'm not prepared to go into a full explanation here of how the Control Points work, partly because I'm still figuring it out myself. If you want to learn more about the Control Points, head over to the Nik Software site and look at their video tutorials. That's what I did.)
The values I set to determine to top-to-bottom differential in exposure were small...-10 at the top and 0 at the bottom, as I generally only want to make minor, barely noticeable tweaks.
Here is the result...barely noticeable, right?
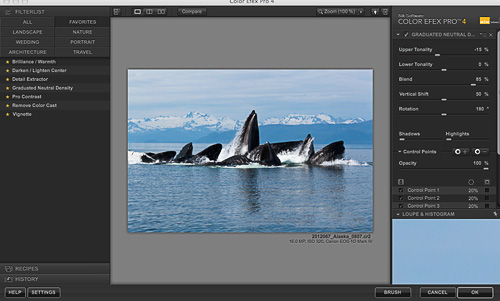
Nik Color Efex Pro 4, Graduated ND Filter
3. Color Efex Pro 4: Brilliance/ Warmth Filter
Once that was done, I decided to add a dash of saturation to the whales, to try to get them to stand out a bit from the nearly monotone background.
To do this, I used the Perceptual Saturation slider in the Brilliance/ Warmth Filter.
Here's before applying the slider:
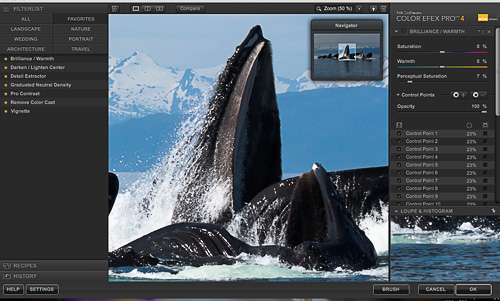
Before applying the Perceptual Saturation slider
And here's after:
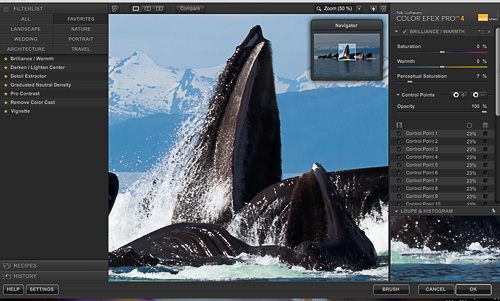
After applying the Perceptual Saturation slider
This time, I used the Control Points to concentrate the effect on the whales, not the water or mountains, and I applied only a very subtle effect (Perceptual Saturation slider on 7%, leaving Saturation and Warmth at 0).
The Perceptual Saturation slider is really cool. I'm not sure how to describe the effect, but it sort of figures out what/ where needs a saturation boost and adjust colours in a dynamic manner. It's more intelligent/ subtle than just pumping up saturation in Photoshop.
4. Color Efex Pro 4: Glamor Glow Filter
This probably isn't a filter you'd normally think about for a photograph of humpback whales bubble-net feeding, but I played with the glamor glow filter. My intent was to reduce the visual impact of the background, so once again, I applied Control Points to restrict the effect to the background, not the whales:
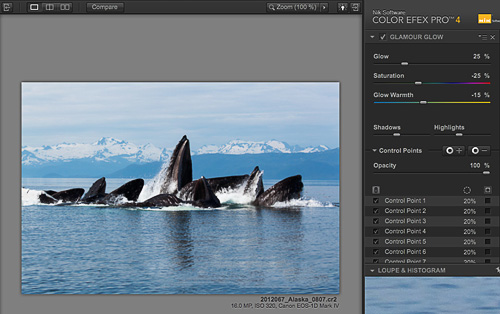
Making creative use of the glamor glow filter
The slider settings cooled the background (cooler colours tend to fade in visual importance, and cool tones accurately reflect the conditions that day) and reduced the saturation.
Once again, the effect doesn't knock you over the head. It's subtle.
5. Color Efex Pro 4: Remove Color Cast Filter
After I took a break, I came back, looked at my work-in-progress, and decided that I wanted to cool the overall image more.
I turned to the Remove Color Cast Filter, which allows you to adjust the overall color temperature, once again applying a barely noticeable adjustment, this time to the entire image. I forgot to take a screen shot of this step.
6. Color Efex Pro 4: Detail Extractor Filter
To recover a bit of the detail, especially in the shadows of the whales, I played with the Detail Extractor Filter. This seems to be a very powerful filter, but you have to be careful not to re-introduce noise as a byproduct.
Here is a close-up of part of the image before the Detail Extractor:
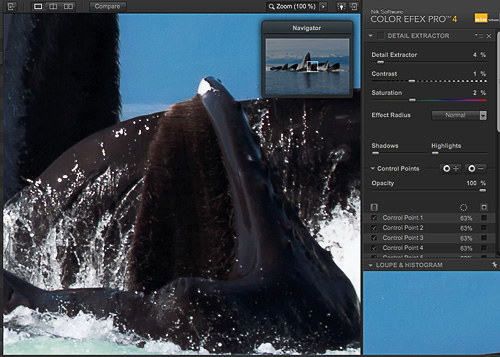
Before applying the Detail Extractor Filter
And here is the same section after a (you guessed it!) teeny-tiny subtle application of this filter:
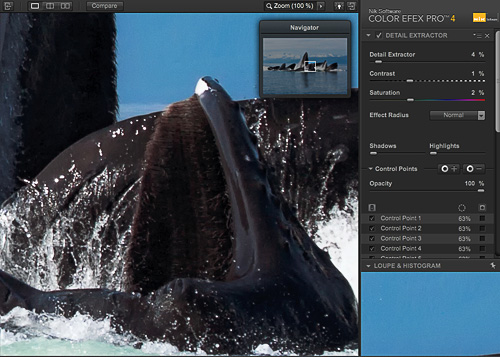
After applying the Detail Extractor Filter. See the extra detail?
Again...I used the Control Points to apply this filter only to the whales, not the mountains or ocean.
I arrived at the settings (Detail Extractor 4%, Contrast 1%, Saturation 2%) by first zooming out to look at the overall effect, then zooming in to see how much noise I was creating as a byproduct...striking a balance between my desire to bring out detail while not messing up the file.
Notice again that I did not wang the sliders way out to something silly like 50%!
7. Silver Efex Pro 2: High Structure (Smooth)
And finally, I did something wacky.
The Silver Efex Pro plug-in is designed to convert colour images to black-and-white. That's how most people use it.
I applied Silver Efex to add a little extra punch to the image...in colour.
First, I opened the image in Silver Efex Pro and chose the High Structure (Smooth) pre-set (after playing with a whole bunch of the pre-sets to see how they affected the image).
I scrolled down the right bar until I found the colour filters and selected the yellow one (If you don't know how/ why colour filters affect black-and-white images, I suggest searching for the subject on Google and reading up on it. Trust me. It's interesting.)
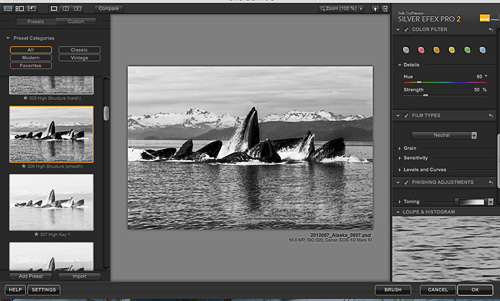
Using Silver Efex Pro to tweak a colour image
Then I applied the filter pre-set, changed the blend mode for the resulting layer to Luminosity, and reduced the layer opacity to 33% to get the look I wanted.
(The previous sentence almost makes it sound like I know what I'm doing. What actually transpired was that I played around with blend modes until I got the effect I wanted.)
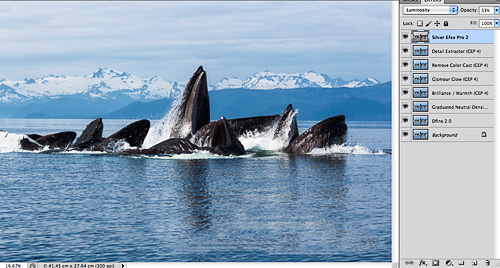
The final product, with all steps shown
That's it. The entire process was pretty intuitive.
It took me a few hours, but that mostly because I was playing with filters and trying out different combinations. I suspect I'll get better and faster at deciding which filters to use as I grow more familiar with them.
I've started experimenting with applying the Nik Software plug-ins to processing underwater images too. As always however, underwater images (especially blue-water ones) pose unique challenges, so I haven't quite worked out how to make best use of the Nik Software for marine images yet.